Identity Platform
- Identity Charmers | bundle
| Channel | Revision | Published |
|---|---|---|
| latest/edge | 39 | 14 Jan 2025 |
| istio/edge | 38 | 12 Jan 2025 |
| 0.3/edge | 32 | 20 Sep 2024 |
| 0.2/edge | 25 | 09 May 2024 |
| 0.1/edge | 17 | 25 Apr 2024 |
juju deploy identity-platform --channel edge
Deploy Kubernetes operators easily with Juju, the Universal Operator Lifecycle Manager. Need a Kubernetes cluster? Install MicroK8s to create a full CNCF-certified Kubernetes system in under 60 seconds.
Platform:
Getting started with the Identity and Access Proxy
Applications that do not conform to OAuth 2.0 and OIDC standards or don’t offer built-in access control need to be secured in alternative ways.
The Canonical Identity and Access Proxy (IAP) solution fills that security gap, offering a possibility to protect endpoints by intercepting incoming requests and delegating the authn/authz process to the relevant components of the Canonical Identity Platform.
The Canonical Identity and Access Proxy is based on open source products from Ory and Traefik Labs.
In this tutorial you will:
- deploy both the Identity and Access Proxy and Identity Platform
- connect the platform with GitHub as an identity provider
- provide IAP protection to Spark History Server.
Requirements
This tutorial assumes you have
- A Juju controller (v3.1+) bootstrapped on a MicroK8s or other K8s cluster that is ready to use.
See more: Install Microk8s Charm SDK | Tutorial > Set up Juju
- MinIO Kubernetes Plugin enabled.
See more: Enable MinIO plugin on Microk8s
- MinIO credentials and S3 endpoint necessary to configure Spark History Server.
Deploy the Identity Platform Bundle
For the Identity Platform bundle deployment to go smoothly, make sure the MetalLB MicroK8s addon is enabled.
microk8s enable metallb:10.64.140.43-10.64.140.49
Create a dedicated model for the Identity Platform bundle. To do that, run:
juju add-model iam
Next, deploy the Identity Platform:
juju deploy identity-platform --trust --channel edge
The Juju controller will now fetch the Identity Platform bundle from Charmhub and begin deploying it on the MicroK8s cloud. This process will take several minutes, depending on your hardware and network speed.
You can track the progress by running:
watch -c juju status --relations --color
When the command displays a similar output, it means that the bundle is ready for further configuration:
App                                  Version  Status   Scale  Charm                                Channel        Rev  Address         Exposed
  Message
hydra                                v2.2.0   active       1  hydra                                latest/edge    269  10.152.183.122  no

identity-platform-login-ui-operator           active       1  identity-platform-login-ui-operator  latest/edge     82  10.152.183.99   no
  installing agent
kratos                               v1.1.0   active       1  kratos                               latest/edge    393  10.152.183.124  no

kratos-external-idp-integrator                waiting      1  kratos-external-idp-integrator       latest/edge    188  10.152.183.136  no
  installing agent
postgresql-k8s                       14.10    active       1  postgresql-k8s                       14/stable      193  10.152.183.160  no

self-signed-certificates                      active       1  self-signed-certificates             latest/edge     52  10.152.183.25   no

traefik-admin                       v2.11.0   active       1  traefik-k8s                          latest/stable  166  10.64.140.44    no

traefik-public                      v2.11.0   active       1  traefik-k8s                          latest/stable  166  10.64.140.45    no


Unit                                    Workload  Agent  Address      Ports  Message
hydra/0*                                active    idle   10.1.130.62
identity-platform-login-ui-operator/0*  active    idle   10.1.130.20
kratos-external-idp-integrator/0*       blocked   idle   10.1.130.33         Invalid configuration: Missing required configuration 'issuer_url
' for provider 'generic'
kratos/0*                               active    idle   10.1.130.47
postgresql-k8s/0*                       active    idle   10.1.130.42
self-signed-certificates/0*             active    idle   10.1.130.18
traefik-admin/0*                        active    idle   10.1.130.9
traefik-public/0*                       active    idle   10.1.130.40
You can notice that the kratos-external-idp-integrator is in a blocked state. In the next step we will configure it with an identity provider.
Connect the Identity Platform with identity provider
In this part of the tutorial we will connect the Identity Platform with GitHub.
To achieve it, you will need to register an application on GitHub. Before doing that, get to know the Kratos redirect url.
First, inspect the Kratos base url:
juju run traefik-public/0 show-proxied-endpoints --format yaml 2>/dev/null | yq '."traefik-public/0".results."proxied-endpoints"' | yq '.kratos'
Given the model name iam, the base url will look similar to https://<traefik-public-IP>/iam-kratos. The redirect url will therefore be https://<traefik-public-IP>/iam-kratos/self-service/methods/oidc/callback/github.
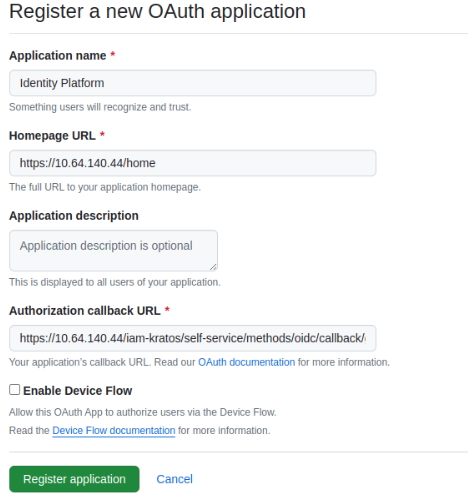
You can now go to GitHub developer settings and register a new GitHub application. While the application name and homepage url are up to you, the authorization callback url must be the Kratos redirect url you fetched in the previous step. You don’t need to check the “Enable Device Flow” checkbox.

Next, generate a client secret and make sure to copy it along with the client id.
You now have everything needed to configure kratos-external-idp-integrator with GitHub:
juju config kratos-external-idp-integrator \
  provider=github \
  client_id=<client-id> \
  client_secret=<client-secret> \
  provider_id=github \
  scope=user:email
See more: How to integrate identity providers
Deploy Identity and Access Proxy
In this step we will extend the Identity Platform deployment with Identity and Access Proxy.
In order to set up the proxy, you first need to enable the ForwardAuth feature in Charmed Traefik:
juju config traefik-public enable_experimental_forward_auth=True
The next step is to deploy Charmed Oathkeeper and integrate it with Charmed Traefik:
juju deploy oathkeeper --channel edge --trust
juju integrate oathkeeper traefik-public:experimental-forward-auth
Finally, integrate the IAP with Identity Platform using Kratos:
juju integrate oathkeeper kratos
juju config kratos dev=True
You are now ready to proceed to the next step.
Integrate Identity and Access Proxy with Spark History Server
In this part of the tutorial we will deploy Charmed Spark History Server and provide protection to its endpoints by integrating it with the Identity and Access Proxy.
Deploy Spark History Server
See more: Deploy Spark History Server
Before deploying the application, some prerequisites must be met. First, export your MinIO credentials and S3 endpoint as environment variables:
You can run this script to retrieve them.
export S3_ENDPOINT=<ENDPOINT>
export S3_BUCKET=history-server
export ACCESS_KEY=<ACCES_KEY>
export SECRET_KEY=<SECRET_KEY>
Create an S3 bucket named history-server and a path object spark-events to store Spark logs in S3. This can be done in multiple ways depending on your S3 backend interface. For instance, you can do it with Python API using boto library:
from botocore.client import Config
import boto3

config = Config(connect_timeout=60, retries={"max_attempts": 0})
session = boto3.session.Session(
    aws_access_key_id="<access-key>", aws_secret_access_key="<secret-key>"
)
s3 = session.client("s3", endpoint_url="<s3-endpoint>", config=config)

s3.create_bucket(Bucket="history-server")
s3.put_object(Bucket="history-server", Key=("spark-events/"))
Next, deploy the s3 integrator charm:
juju deploy s3-integrator -n1 --channel edge
juju config s3-integrator bucket=$S3_BUCKET path="spark-events" endpoint=$S3_ENDPOINT
juju run s3-integrator/leader sync-s3-credentials access-key=$ACCESS_KEY secret-key=$SECRET_KEY
Then, deploy the Spark History Server and relate with s3 integrator:
juju deploy spark-history-server-k8s --channel edge --trust
juju integrate s3-integrator spark-history-server-k8s
Use Identity and Access Proxy to protect Spark History Server access
Provide ingress to Spark by running:
juju integrate spark-history-server-k8s traefik-public
Finally, integrate Spark with the proxy:
juju integrate oathkeeper spark-history-server-k8s:auth-proxy
As a result of the integration, Charmed Oathkeeper will create a set of access rules that define restrictions on Spark History Server access. Charmed Traefik will enforce applying those rules with the ForwardAuth middleware.
Validate the integrations
To verify that the integration was successful, try accessing the Spark History Server and check if authentication is required.
Inspect the public url by running:
juju run traefik-public/0 show-proxied-endpoints --format yaml 2>/dev/null | yq '."traefik-public/0".results."proxied-endpoints"' | yq '.spark-history-server-k8s'
Go to the retrieved url in a browser and trust the self-signed certificate.
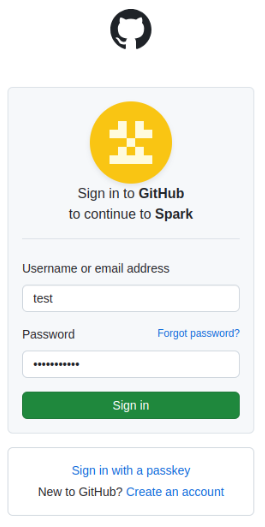
When you access Spark, Traefik asks Oathkeeper whether access to the endpoint is protected. If so, it checks if there is a valid session. In case it doesn’t find one, it will redirect to the Identity Platform login page and offer to sign in with GitHub:

Go through the authentication process to log in.

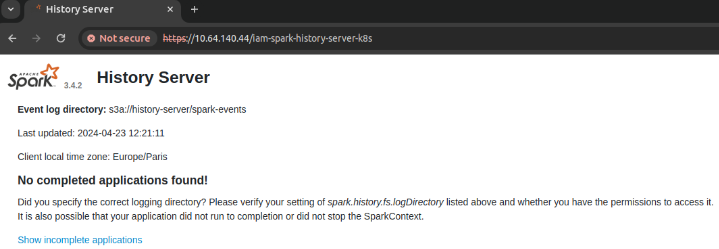
Upon successful authentication, you will be redirected back to the Spark url, this time allowed to see its content. Note that you won’t see any jobs unless you completed one.
