
Kubeflow
- Kubeflow Charmers | bundle
- Cloud
| Channel | Revision | Published |
|---|---|---|
| latest/candidate | 294 | 24 Jan 2022 |
| latest/beta | 430 | 30 Aug 2024 |
| latest/edge | 423 | 26 Jul 2024 |
| 1.10/stable | 436 | 07 Apr 2025 |
| 1.10/candidate | 434 | 02 Apr 2025 |
| 1.10/beta | 433 | 24 Mar 2025 |
| 1.9/stable | 432 | 03 Dec 2024 |
| 1.9/beta | 420 | 19 Jul 2024 |
| 1.9/edge | 431 | 03 Dec 2024 |
| 1.8/stable | 414 | 22 Nov 2023 |
| 1.8/beta | 411 | 22 Nov 2023 |
| 1.8/edge | 413 | 22 Nov 2023 |
| 1.7/stable | 409 | 27 Oct 2023 |
| 1.7/beta | 408 | 27 Oct 2023 |
| 1.7/edge | 407 | 27 Oct 2023 |
juju deploy kubeflow --channel latest/edge
Deploy Kubernetes operators easily with Juju, the Universal Operator Lifecycle Manager. Need a Kubernetes cluster? Install MicroK8s to create a full CNCF-certified Kubernetes system in under 60 seconds.
Platform:
This tutorial walks you through some of the main components of Charmed Kubeflow (CKF). By the end of it, you will have created a complete end-to-end Machine Learning (ML) pipeline using Kubeflow Pipelines, MLflow and KServe.
First, you will use Kubeflow Notebooks to create and connect to a JupyterLab environment. Then, you will create a Kubeflow Pipeline to process a wine dataset, train it on an ML model and predict its quality. Finally, you will store the model in the MLflow registry, and leverage the KServe inference service for model deployment.
You can download the code used for this tutorial as a Jupyter Notebook here.
Requirements
- Charmed Kubeflow (CKF) has been deployed on your machine. See Get started for more details.
- MLflow has been deployed and connected with Kubeflow. See this tutorial for more details.
Kubeflow notebooks
From the sidebar of the Kubeflow central dashboard, go to Notebooks and click on New Notebook. Enter a name for your notebook, and select the kubeflownotebookswg/jupyter-scipy:v1.9.0 image:
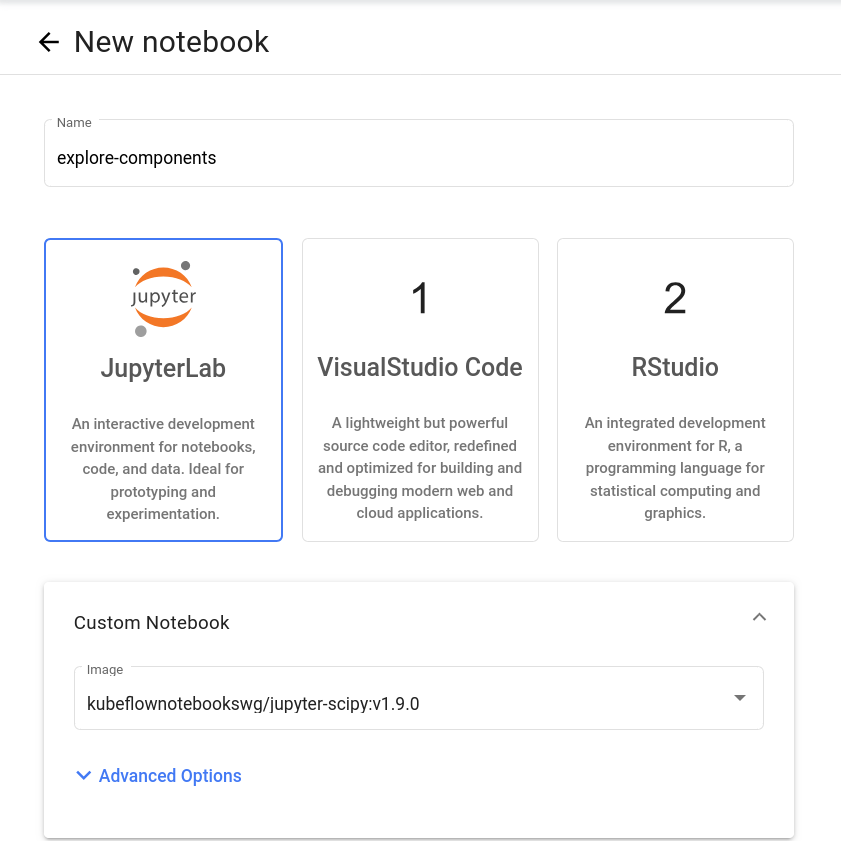
From Advanced Options, go to Configurations and allow access to Kubeflow Pipelines, MinIO, and MLflow from the dropdown menu:

This ensures the correct credentials are injected into the JupyterLab environment, simplifying the interaction with MLflow and MinIO.
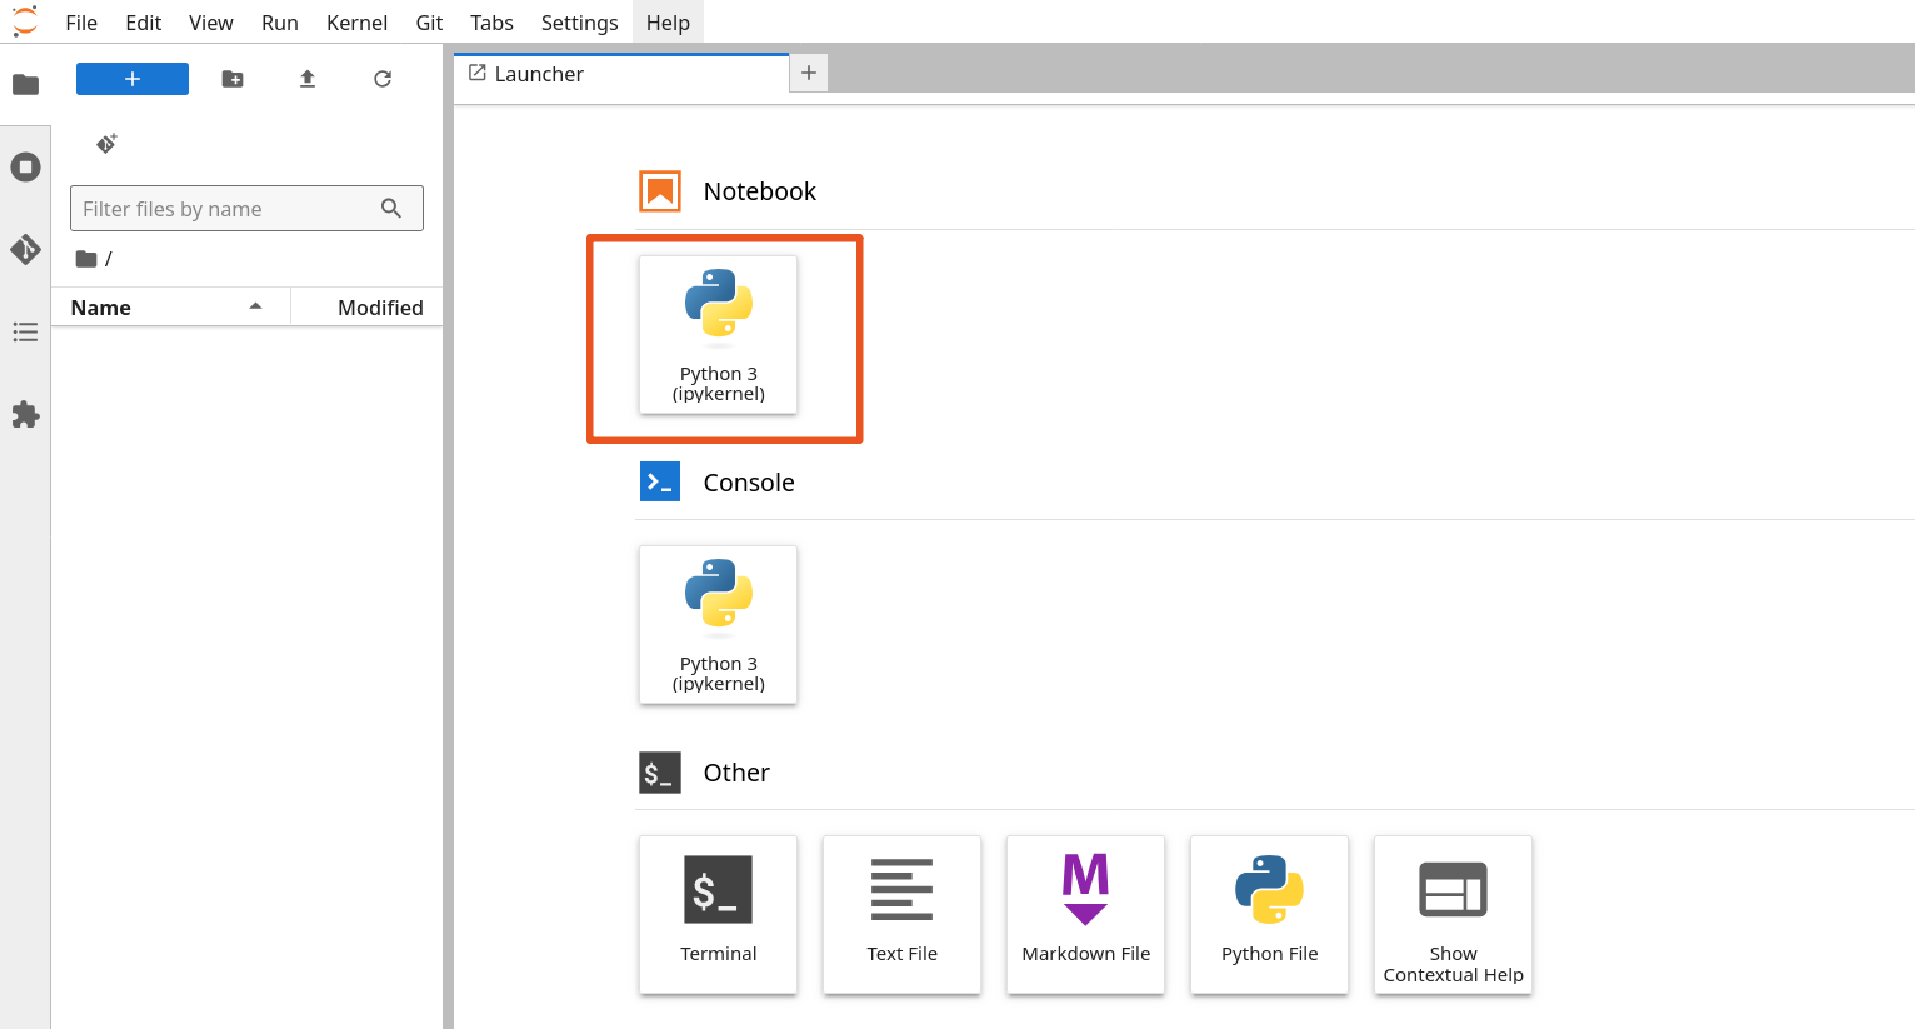
After you have configured your notebook server, click on Launch to create it. Wait until the server status is Running, indicated by a green check mark, and then click on Connect to view the server web interface.
From the JupyterLab interface, create a new Python 3 Jupyter Notebook:
Now install the Python packages required for the remaining of the tutorial:
!pip install mlflow==2.15.1 kserve==0.13.1 tenacity
Kubeflow pipelines
A Kubeflow pipeline is a definition of a workflow that composes one or more components together to form a computational Directed Acyclic Graph (DAG). Each component execution corresponds to a Docker container execution. See Kubeflow Pipelines overview for more details.
In this tutorial, you will create a Kubeflow pipeline that consists of the following steps:
- Data ingestion: downloading a wine quality dataset from a public URL.
- Data preprocessing: cleaning and transforming the dataset into a format suitable for model training.
- Model training: training an ElasticNet regression model to predict wine quality, with automatic logging of model artefacts to MLflow.
- Model deployment: deploying the trained model as a scalable inference service using KServe.
First, import the necessary components required for the remaining of the tutorial:
import kfp
import mlflow
import os
import requests

from kfp.dsl import Input, Model, component
from kfp.dsl import InputPath, OutputPath, pipeline, component
from kserve import KServeClient
from mlflow.tracking import MlflowClient
from tenacity import retry, stop_after_attempt, wait_exponential
Ingest your data
Create a component that downloads the sample dataset, imports it as a .csv file and then saves it at a specified path:
@component(
    base_image="python:3.11",
    packages_to_install=["requests==2.32.3", "pandas==2.2.2"]
)
def download_dataset(url: str, dataset_path: OutputPath('Dataset')) -> None:
    import requests
    import pandas as pd

    response = requests.get(url)
    response.raise_for_status()

    from io import StringIO
    dataset = pd.read_csv(StringIO(response.text), header=0, sep=";")

    dataset.to_csv(dataset_path, index=False)
Process the data
Create a component that preprocesses the dataset and saves it as an Apache Parquet file for a more efficient storage:
@component(
    base_image="python:3.11",
    packages_to_install=["pandas==2.2.2", "pyarrow==15.0.2"]
)
def preprocess_dataset(dataset: InputPath('Dataset'), output_file: OutputPath('Dataset')) -> None:
    import pandas as pd

    df = pd.read_csv(dataset, header=0)
    df.columns = [c.lower().replace(" ", "_") for c in df.columns]
    df.to_parquet(output_file)
Train an ML model
Now that the dataset is preprocessed, you can write a component that splits the dataset into training and testing data, trains an ElasticNet regression model, and logs all model artefacts to MLflow:
@component(
    base_image="python:3.11",
    packages_to_install=["pandas==2.2.2", "scikit-learn==1.5.1", "mlflow==2.15.1", "pyarrow==15.0.2", "boto3==1.34.162"]
)
def train_model(dataset: InputPath('Dataset'), run_name: str, model_name: str) -> str:
    import os
    import mlflow
    import pandas as pd
    from sklearn.linear_model import ElasticNet
    from sklearn.model_selection import train_test_split

    df = pd.read_parquet(dataset)

    target_column = "quality"

    train_x, test_x, train_y, test_y = train_test_split(
        df.drop(columns=[target_column]),
        df[target_column], test_size=0.25,
        random_state=42, stratify=df[target_column]
    )

    mlflow.sklearn.autolog()

    with mlflow.start_run(run_name=run_name) as run:
        mlflow.set_tag("author", "kf-testing")
        lr = ElasticNet(alpha=0.5, l1_ratio=0.5, random_state=42)
        lr.fit(train_x, train_y)
        mlflow.sklearn.log_model(lr, "model", registered_model_name=model_name)

        model_uri = f"{run.info.artifact_uri}/model"
        print(model_uri)
        return model_uri
Deploy the ML model
After the model has been trained, you can create a KServe inference service to enable scalable and performant model inference using HTTP requests. See KServe documentation for more details.
Write a component that creates a KServe inference service and returns its URL as follows:
@component(
    base_image="python:3.11",
    packages_to_install=["kserve==0.13.1", "kubernetes==26.1.0", "tenacity==9.0.0"]
)
def deploy_model_with_kserve(model_uri: str, isvc_name: str) -> str:
    from kubernetes.client import V1ObjectMeta
    from kserve import (
        constants,
        KServeClient,
        V1beta1InferenceService,
        V1beta1InferenceServiceSpec,
        V1beta1PredictorSpec,
        V1beta1SKLearnSpec,
    )
    from tenacity import retry, wait_exponential, stop_after_attempt

    isvc = V1beta1InferenceService(
        api_version=constants.KSERVE_V1BETA1,
        kind=constants.KSERVE_KIND,
        metadata=V1ObjectMeta(
            name=isvc_name,
            annotations={"sidecar.istio.io/inject": "false"},
        ),
        spec=V1beta1InferenceServiceSpec(
            predictor=V1beta1PredictorSpec(
                service_account_name="kserve-controller-s3",
                sklearn=V1beta1SKLearnSpec(
                    storage_uri=model_uri
                )
            )
        )
    )

    client = KServeClient()
    client.create(isvc)

    @retry(
        wait=wait_exponential(multiplier=2, min=1, max=10),
        stop=stop_after_attempt(30),
        reraise=True,
    )
    def assert_isvc_created(client, isvc_name):
        assert client.is_isvc_ready(isvc_name), f"Failed to create Inference Service {isvc_name}."

    assert_isvc_created(client, isvc_name)
    isvc_resp = client.get(isvc_name)
    isvc_url = isvc_resp['status']['address']['url']
    print("Inference URL:", isvc_url)

    return isvc_url
Create a pipeline
Create a pipeline that combines all the components you defined in the previous sections:
ISVC_NAME = "wine-regressor4"
MLFLOW_RUN_NAME = "elastic_net_models"
MLFLOW_MODEL_NAME = "wine-elasticnet"

mlflow_tracking_uri = os.getenv('MLFLOW_TRACKING_URI')
mlflow_s3_endpoint_url = os.getenv('MLFLOW_S3_ENDPOINT_URL')
aws_access_key_id = os.getenv('AWS_ACCESS_KEY_ID')
aws_secret_access_key = os.getenv('AWS_SECRET_ACCESS_KEY')

@pipeline(name='download-preprocess-train-deploy-pipeline')
def download_preprocess_train_deploy_pipeline(url: str):
    download_task = download_dataset(url=url)

    preprocess_task = preprocess_dataset(
        dataset=download_task.outputs['dataset_path']
    )

    train_task = train_model(
        dataset=preprocess_task.outputs['output_file'], run_name=MLFLOW_RUN_NAME, model_name=MLFLOW_MODEL_NAME
    ).set_env_variable(name='MLFLOW_TRACKING_URI', value=mlflow_tracking_uri)\
     .set_env_variable(name='MLFLOW_S3_ENDPOINT_URL', value=mlflow_s3_endpoint_url)\
     .set_env_variable(name='AWS_ACCESS_KEY_ID', value=aws_access_key_id)\
     .set_env_variable(name='AWS_SECRET_ACCESS_KEY', value=aws_secret_access_key)

    deploy_task = deploy_model_with_kserve(
        model_uri=train_task.output, isvc_name=ISVC_NAME
    ).set_env_variable(name='AWS_SECRET_ACCESS_KEY', value=aws_secret_access_key)
Execute the pipeline
To execute the pipeline, you first have to initialise a Kubeflow Pipelines (KFP) client to interact with the Kubeflow Pipelines API. Then, you must compile the pipeline to a compatible YAML file and create a run from the produced YAML file as follows:
client = kfp.Client()

url = 'https://raw.githubusercontent.com/canonical/kubeflow-examples/main/e2e-wine-kfp-mlflow/winequality-red.csv'

kfp.compiler.Compiler().compile(download_preprocess_train_deploy_pipeline, 'download_preprocess_train_deploy_pipeline.yaml')

run = client.create_run_from_pipeline_func(download_preprocess_train_deploy_pipeline, arguments={'url': url}, enable_caching=False)
You can check the run information by clicking on Run Details from the cell’s output.
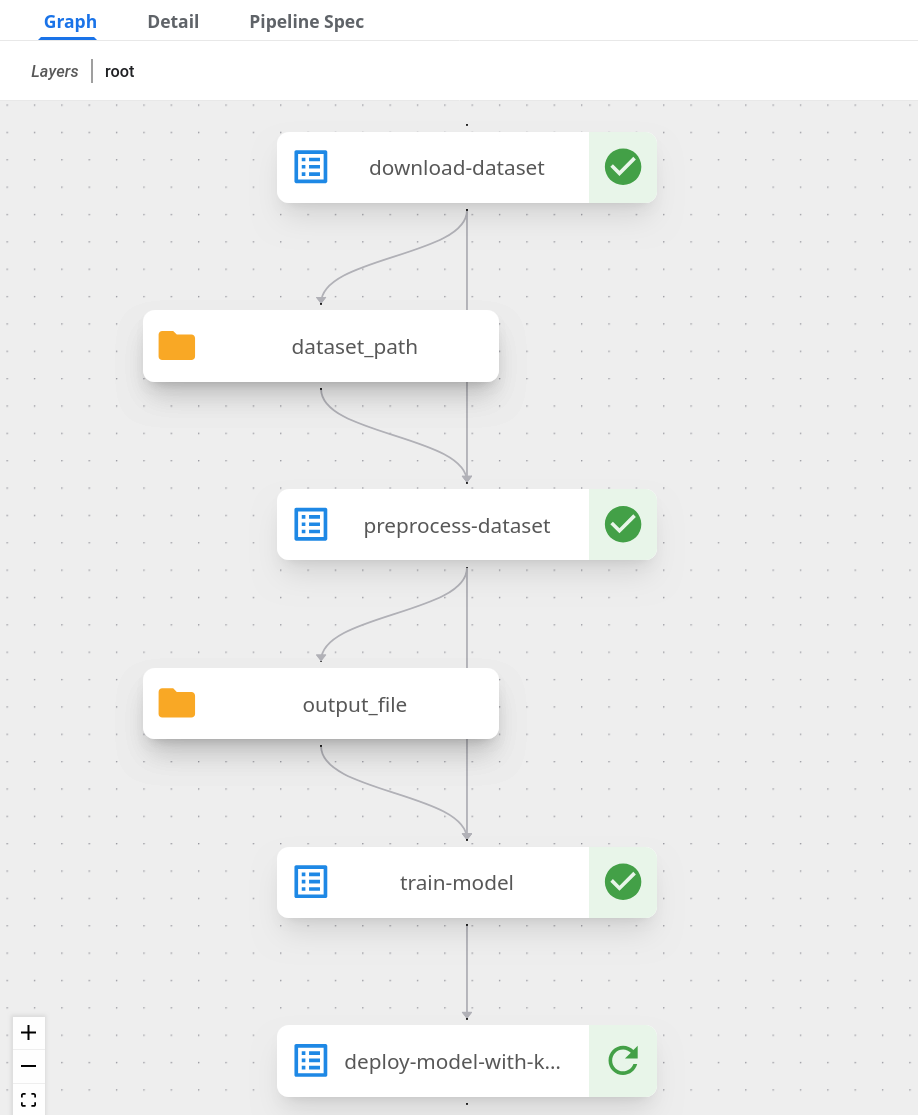
You can also check the graph view of the compiled pipeline and related components:
Next, write and execute a function that continuously checks whether the run has finished and was successful:
@retry(
    wait=wait_exponential(multiplier=2, min=1, max=10),
    stop=stop_after_attempt(90),
    reraise=True,
)
def assert_kfp_run_succeeded(client, run_id):
    run = client.get_run(run_id=run_id)
    state = run.state
    assert state == "SUCCEEDED", f"KFP run is in {state} state."

assert_kfp_run_succeeded(client, run.run_id)
The run may take up to 10 minutes to complete.
MLflow
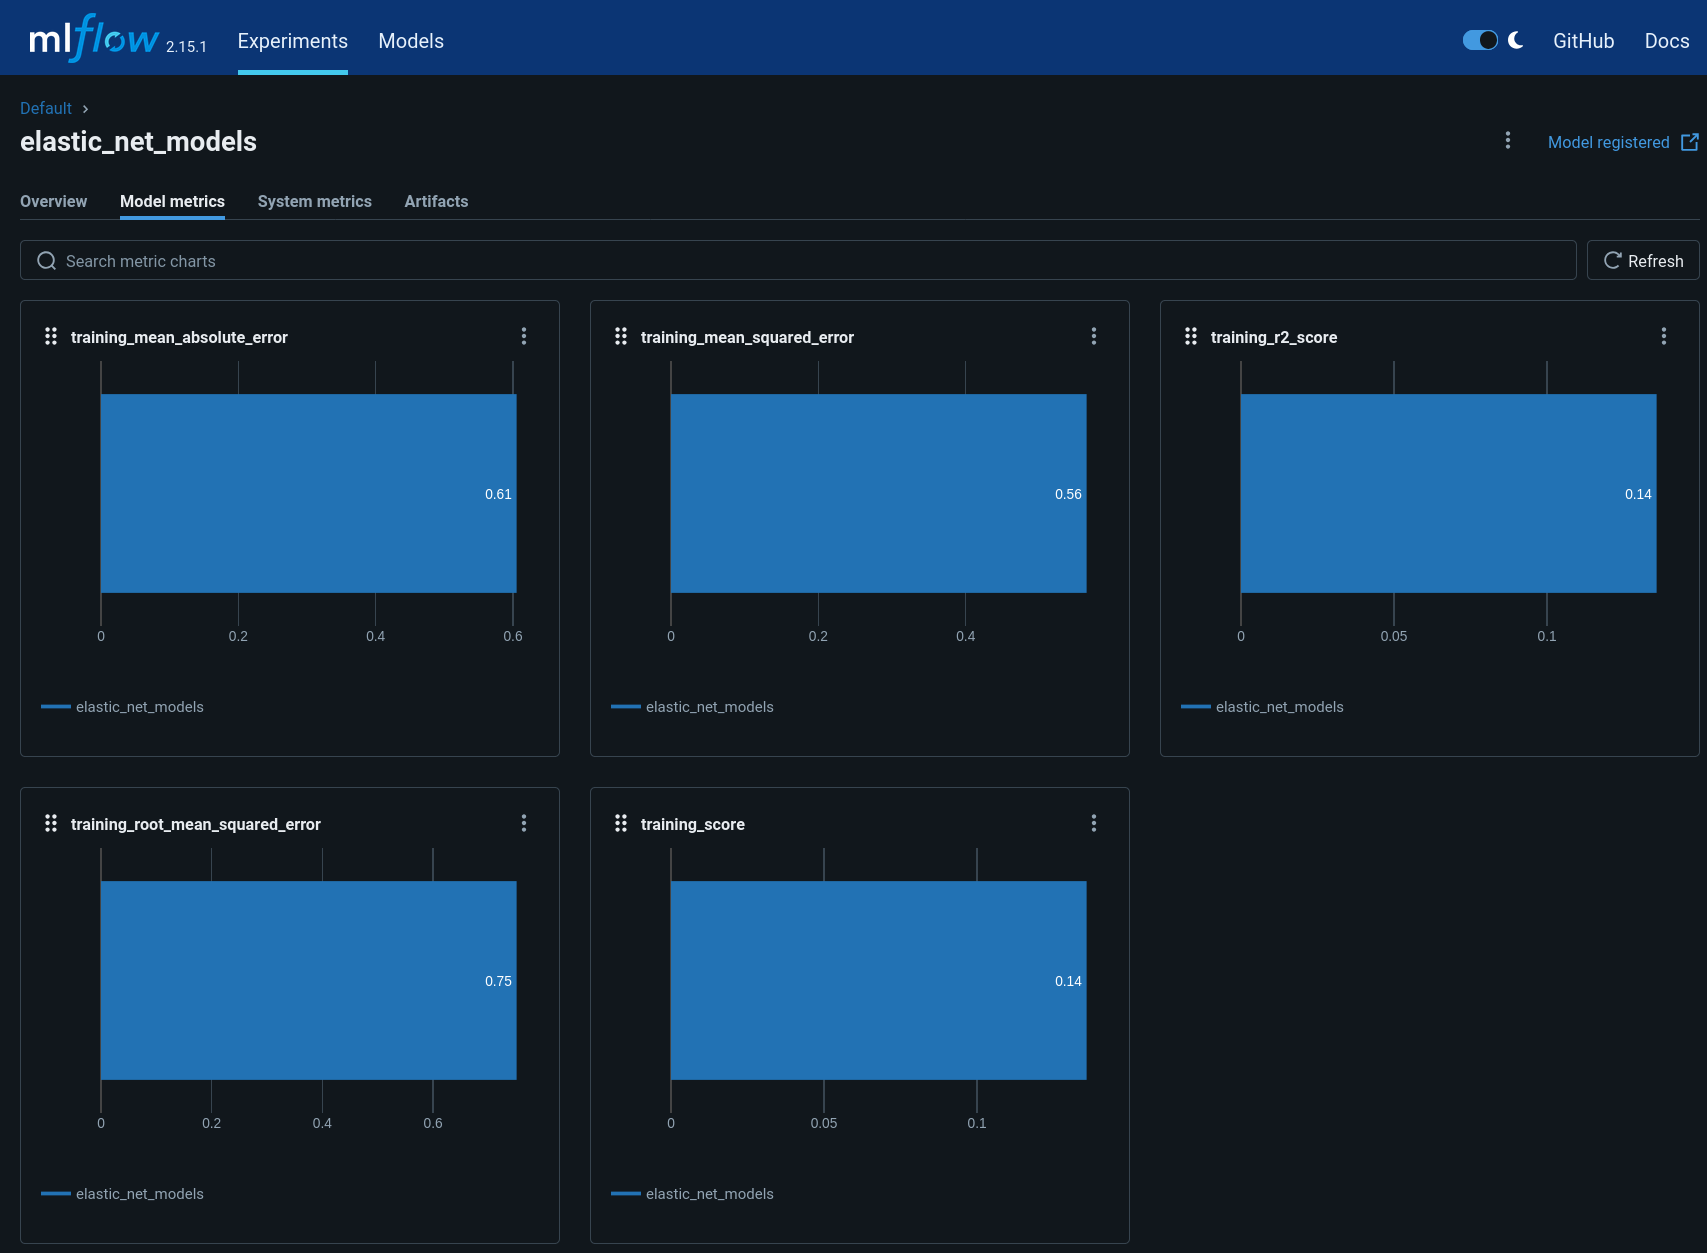
The pipeline compiled in the previous section registers an MLflow experiment, used for tracking parameters, metrics, artifacts, data and environment configuration. Additionally, the ElasticNet regression model is also stored in the MLflow model registry, which enables model versioning, aliasing, tracking and annotations.
To view the MLflow tracking User Interface (UI), select MLflow from the Kubeflow central dashboard sidebar. Within Experiments, you can see information about each experiment, including used dataset, hyperparameters and model metrics:
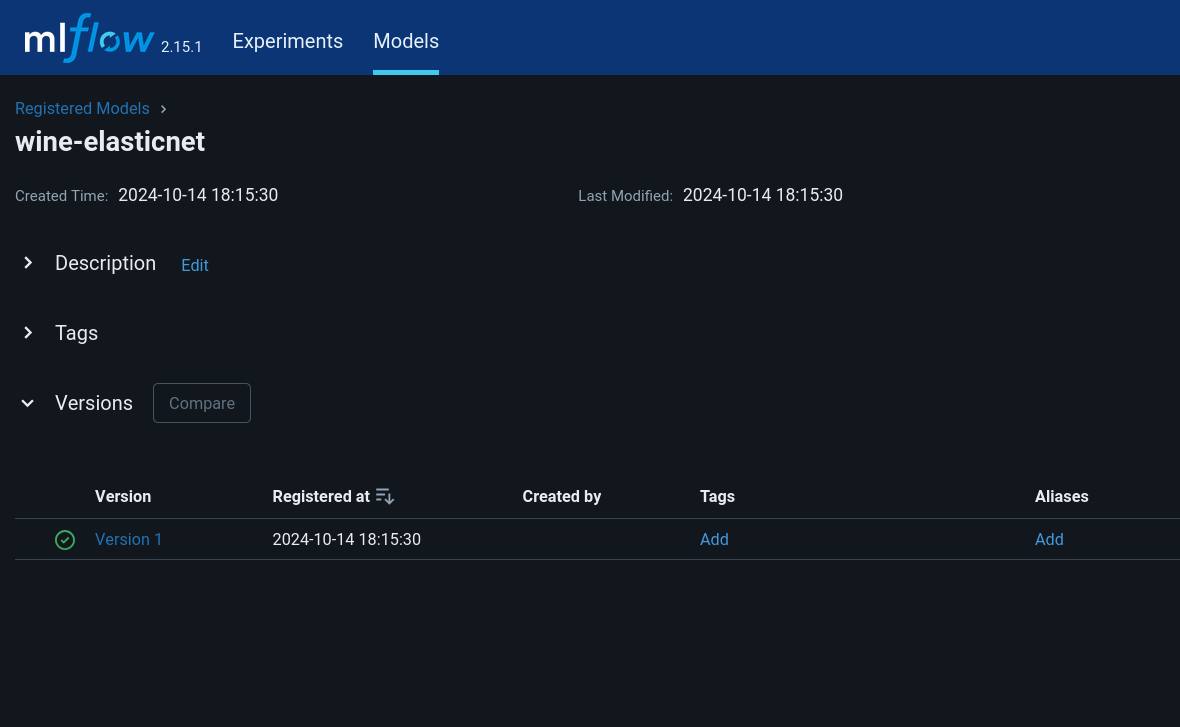
Within Models, you can see information related to registered models, including description, tags and version:
KServe
A KServe client can be used to interact with the KServe inference service. You can use the client to send data to the deployed model via a POST request, and receive the model output as follows:
kserve_client = KServeClient()

isvc_resp = kserve_client.get(ISVC_NAME)
inference_service_url = isvc_resp['status']['address']['url']
print("Inference URL:", inference_service_url)

input_data = {
    "instances": [
        [7.4, 0.7, 0.0, 1.9, 0.076, 11.0, 34.0, 0.9978, 3.51, 0.56, 9.4],
        [7.8, 0.88, 0.0, 2.6, 0.098, 25.0, 67.0, 0.9968, 3.2, 0.68, 9.8]
    ]
}

response = requests.post(f"{inference_service_url}/v1/models/{ISVC_NAME}:predict", json=input_data)
print(response.text)
Clean up
To free up resources, use the KServe client to delete the inference service, and the MLflow client to delete the MLflow model:
kserve_client.delete(ISVC_NAME)

@retry(
    wait=wait_exponential(multiplier=2, min=1, max=10),
    stop=stop_after_attempt(30),
    reraise=True,
)
def assert_isvc_deleted(kserve_client, isvc_name):
    try:
        isvc = kserve_client.get(isvc_name)
        assert not isvc, f"Failed to delete Inference Service {isvc_name}!"
    except RuntimeError as err:
        assert "Not Found" in str(err), f"Caught unexpected exception: {err}"

assert_isvc_deleted(kserve_client, ISVC_NAME)

client = MlflowClient()
client.delete_registered_model(name=MLFLOW_MODEL_NAME)
Next steps
- To learn about common tasks and use cases for CKF, see how-to guides.
- To learn about the advantages of using CKF over upstream Kubeflow, see Upstream vs Charmed Kubeflow.

%27%20fill%3D%27%23E95420%27%3E%3Cpath%20d%3D%27m15.839%205.293-1.447-2.8a.136.136%200%200%200-.051-.055.144.144%200%200%200-.074-.02h-5.8a.143.143%200%200%200-.091.03.13.13%200%200%200-.034.17.138.138%200%200%200%20.072.06l7.251%202.8a.144.144%200%200%200%20.17-.054.13.13%200%200%200%20.007-.13l-.003-.001ZM11.839%204.945.073.223A.073.073%200%200%200%20.026.221a.07.07%200%200%200-.038.027.065.065%200%200%200%20.007.086l7.962%208.182a.069.069%200%200%200%20.049.022.072.072%200%200%200%20.047-.019l3.805-3.461a.066.066%200%200%200%20.02-.061.065.065%200%200%200-.014-.03.07.07%200%200%200-.028-.02l.003-.002ZM5.382%207.183a.071.071%200%200%200-.062-.022.07.07%200%200%200-.03.011.067.067%200%200%200-.023.025l-4.13%207.696a.065.065%200%200%200-.005.046.068.068%200%200%200%20.027.038.072.072%200%200%200%20.09-.006L7.13%209.18a.066.066%200%200%200%200-.087l-1.75-1.91Z%27%2F%3E%3C%2Fg%3E%3Cdefs%3E%3CclipPath%20id%3D%27a%27%3E%3Cpath%20fill%3D%27%23fff%27%20d%3D%27M0%200h15.83v15.21H0z%27%2F%3E%3C%2FclipPath%3E%3C%2Fdefs%3E%3C%2Fsvg%3E)

%27%20fill%3D%27%23E95420%27%3E%3Cpath%20d%3D%27M1.936%202.592c.668%200%201.21-.515%201.21-1.151S2.604.29%201.936.29C1.267.29.726.805.726%201.44c0%20.637.541%201.152%201.21%201.152ZM14.56.576H3.404a1.587%201.587%200%200%201%20.024%201.69l-.026.04h11.156a.56.56%200%200%200%20.386-.15.518.518%200%200%200%20.16-.369v-.692a.502.502%200%200%200-.16-.369.543.543%200%200%200-.386-.15ZM1.936%206.701c.668%200%201.21-.515%201.21-1.15%200-.637-.542-1.152-1.21-1.152-.669%200-1.21.515-1.21%201.151s.541%201.151%201.21%201.151ZM14.56%204.685H3.404a1.612%201.612%200%200%201%20.242%201.083c-.03.215-.105.421-.219.608l-.026.04h11.157a.56.56%200%200%200%20.386-.15.518.518%200%200%200%20.16-.37v-.692a.5.5%200%200%200-.16-.369.542.542%200%200%200-.386-.15ZM1.936%2010.81c.668%200%201.21-.515%201.21-1.15%200-.637-.542-1.152-1.21-1.152-.669%200-1.21.515-1.21%201.151s.541%201.151%201.21%201.151ZM14.56%208.795H3.404a1.611%201.611%200%200%201%20.243%201.082%201.581%201.581%200%200%201-.245.648h11.156a.559.559%200%200%200%20.386-.15.517.517%200%200%200%20.16-.37v-.692a.502.502%200%200%200-.16-.368.543.543%200%200%200-.386-.15ZM1.936%2014.92c.668%200%201.21-.515%201.21-1.15%200-.637-.542-1.152-1.21-1.152-.669%200-1.21.515-1.21%201.151s.541%201.151%201.21%201.151ZM14.56%2012.904H3.404a1.611%201.611%200%200%201%20.242%201.082%201.58%201.58%200%200%201-.219.608l-.026.04h11.157a.562.562%200%200%200%20.386-.15.517.517%200%200%200%20.16-.37v-.692a.5.5%200%200%200-.16-.369.543.543%200%200%200-.386-.15Z%27%2F%3E%3C%2Fg%3E%3Cdefs%3E%3CclipPath%20id%3D%27a%27%3E%3Cpath%20fill%3D%27%23fff%27%20d%3D%27M0%200h15.83v15.21H0z%27%2F%3E%3C%2FclipPath%3E%3C%2Fdefs%3E%3C%2Fsvg%3E)
%27%20fill%3D%27%23E95420%27%3E%3Cpath%20d%3D%27M9.618.272c-.634%200-1.243.243-1.691.674-.448.43-.7%201.015-.701%201.624v4.221a1.9%201.9%200%200%201%201.362%200v-4.22a.955.955%200%200%201%20.291-.72%201.067%201.067%200%200%201%201.479%200%20.955.955%200%200%201%20.29.719v.962h1.363V2.57c0-.61-.253-1.194-.702-1.625A2.445%202.445%200%200%200%209.618.272ZM9.017%208.433c0%20.21-.065.417-.187.593a1.102%201.102%200%200%201-.499.393c-.203.08-.426.102-.642.06a1.125%201.125%200%200%201-.568-.292%201.055%201.055%200%200%201-.304-.547%201.028%201.028%200%200%201%20.064-.616c.084-.195.226-.362.41-.479a1.143%201.143%200%200%201%201.401.133c.103.1.185.217.24.347.057.129.085.268.085.408ZM2.773%205.855c-.634.001-1.242.244-1.69.674C.633%206.96.381%207.545.38%208.154v4.082a1.901%201.901%200%200%201%201.363%200V8.154a.955.955%200%200%201%20.29-.719%201.067%201.067%200%200%201%201.479%200%20.955.955%200%200%201%20.29.719v.962h1.363v-.962c0-.61-.253-1.194-.702-1.625a2.444%202.444%200%200%200-1.69-.674ZM2.166%2013.878c0%20.21-.065.415-.186.59-.121.174-.294.31-.496.39-.202.08-.424.102-.638.06a1.119%201.119%200%200%201-.565-.29%201.049%201.049%200%200%201-.302-.543c-.043-.206-.02-.42.063-.614.084-.194.225-.36.407-.476a1.136%201.136%200%200%201%201.394.133%201.024%201.024%200%200%201%20.323.75Z%27%2F%3E%3Cpath%20d%3D%27M14.752%204.76a1.789%201.789%200%200%201-.681-.126v2.411a.972.972%200%200%201-.312.682c-.193.179-.45.28-.718.28-.268%200-.526-.101-.718-.28a.972.972%200%200%201-.312-.682V4.32h-1.363v2.726c0%20.61.252%201.195.7%201.626a2.443%202.443%200%200%200%201.692.673c.635%200%201.244-.242%201.692-.673.449-.431.7-1.016.7-1.626v-2.41a1.9%201.9%200%200%201-.68.125ZM15.858%202.822c.037.225%200%20.455-.107.658a1.1%201.1%200%200%201-.49.472%201.161%201.161%200%200%201-1.302-.198%201.04%201.04%200%200%201-.206-1.251%201.1%201.1%200%200%201%20.492-.47%201.161%201.161%200%200%201%201.299.199c.166.16.276.366.314.59ZM7.907%2010.2c-.233%200-.465-.042-.681-.126V12.6a.97.97%200%200%201-.302.7%201.05%201.05%200%200%201-.728.29%201.05%201.05%200%200%201-.728-.29.97.97%200%200%201-.302-.7V9.845H3.804V12.6c0%20.61.252%201.194.7%201.625a2.443%202.443%200%200%200%201.692.674c.634%200%201.243-.243%201.692-.674.448-.43.7-1.015.7-1.625v-2.526a1.887%201.887%200%200%201-.68.127Z%27%2F%3E%3C%2Fg%3E%3Cdefs%3E%3CclipPath%20id%3D%27a%27%3E%3Cpath%20fill%3D%27%23fff%27%20d%3D%27M0%200h15.83v15.21H0z%27%2F%3E%3C%2FclipPath%3E%3C%2Fdefs%3E%3C%2Fsvg%3E)